Wi-Fi
Your router and network must be configured for 2.4GHz (5GHz is not supported). Ensure you are using either (WPA/WPA2 - Personal ) or (WPA/WPA2 - Enterprise for Client) Security Standards. For additional information see Router Settings.
The thermal imager includes a built-in Wi-Fi feature that automatically transfers captured images to the Snap-on Cloud
Before you can upload images, Wi-Fi must be turned on and the device must be connected to a wireless network.
| 1. | Turn on the thermal imager and press the Menu button. button. |
| 2. | From the toolbar select the Settings icon. |
| 3. | Select Wi-Fi Connection from the menu. |
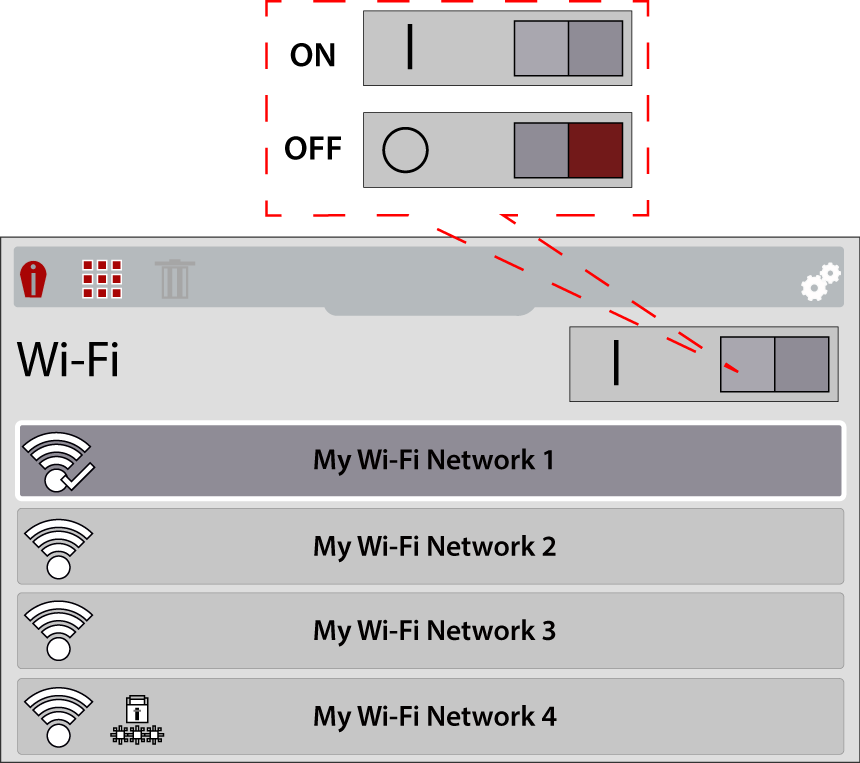
| 4. | To turn Wi-Fi on, press the UP control button to select the Wi-Fi Power icon, then press the Y button to turn Wi-Fi on. |
| 5. | Press the Down control button to enter the Wi-Fi network list, then use the Up / Down control buttons to select a wireless network. Press the Y button to enable the selection. |
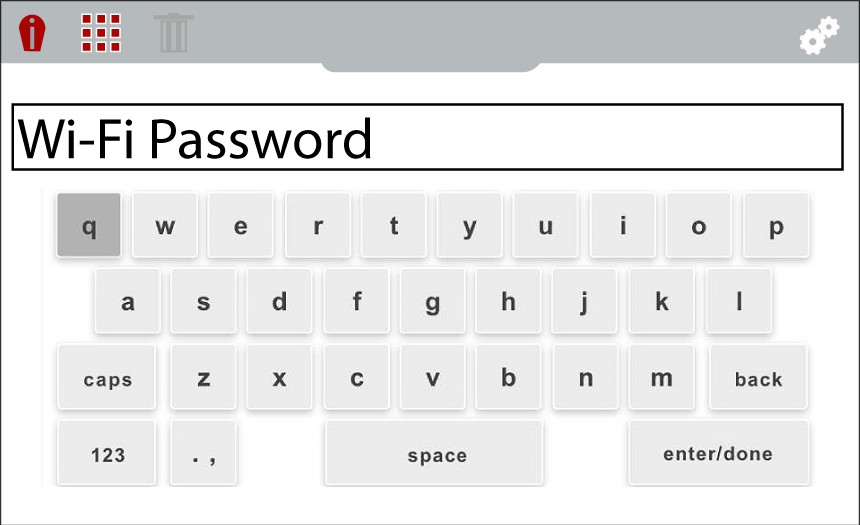
| 6. | If a password is required when choosing a secured (protected)  network, enter the password using the on-screen keyboard and the directional control buttons. Select the “enter/ done” key when finished. network, enter the password using the on-screen keyboard and the directional control buttons. Select the “enter/ done” key when finished. |
When successfully connected to a Wi-Fi network, a check mark will display on the Wi-Fi icon.
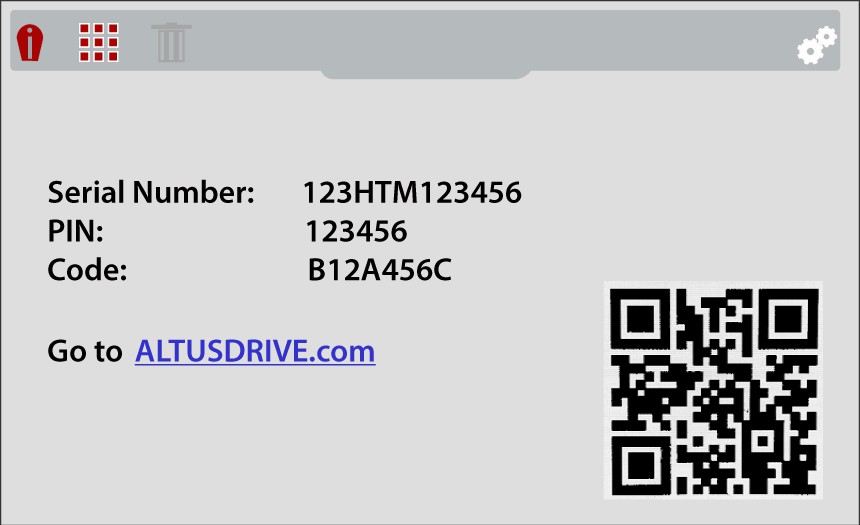
| 7. | A confirmation screen displays showing the device serial number, PIN and Code. These numbers are needed for your Technician Profile setup, see Snap-on Technician Profile Help *. |
Use the QR code to open ALTUSDRIVE.com on your mobile device.
If you are a new owner of this tool, you must add this device to your Technician Profile in order to transfer files to your Snap-on Cloud account. If you do not add the device to your profile, captured files will be sent to the previous owners account.
Your Wi-Fi settings must be configured for 2.4GHz (5GHz is not supported). Ensure you are using either (WPA/WPA2 - Personal ) or (WPA/WPA2 - Enterprise for Client) Security Standards. For additional information see Router Settings.
Mobile device hot spot connection guidelines:
iOS (Typical)
| 1. | Click on “Settings”  |
| 2. | Click on “Personal Hotspot”  |
| 3. | Turn ON “Maximize Compatibility”  |
Android (Typical)
| 1. | Click on “Wi-Fi Settings” |
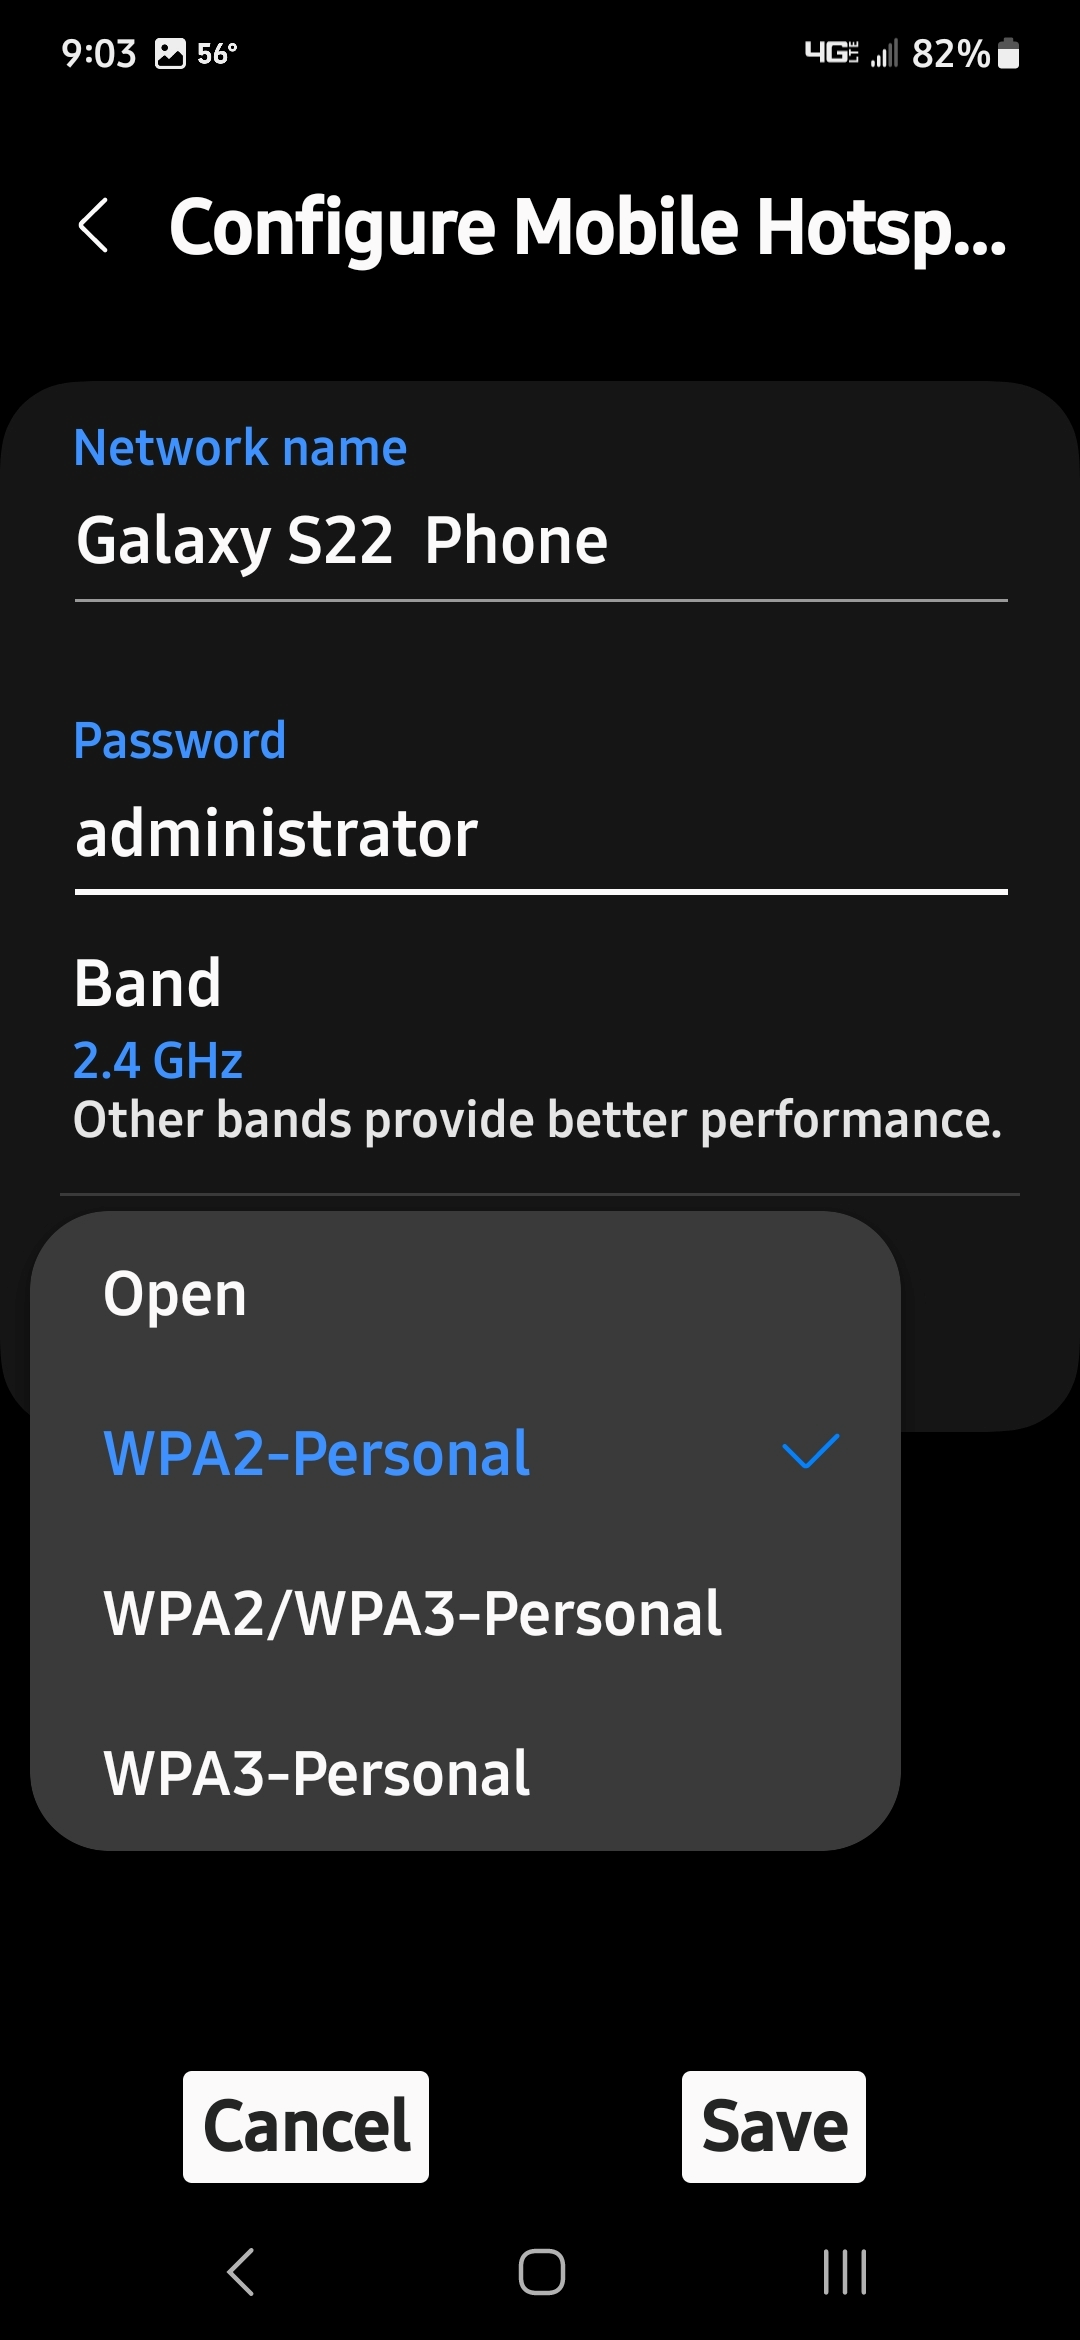
| 2. | Click on “Configure Mobile Hotspot” |
| 3. | Select “WPA2-Personal” |
| 1. | Turn on the thermal imager and press the Menu button. |
| 2. | From the toolbar select the Settings icon. |
| 3. | Select Wi-Fi Connection from the menu. |
| 4. | Select the connected network, and press the Y button. From the menu, select Disconnect or Forget Password. |
The following chart shows the WI-Fi icons used to indicate connection status.
|
Wi-Fi - ON / Connected to network access point and Internet |
|
Wi-Fi - ON / Alternate available network access point |
|
|---|---|---|---|
|
Wi-Fi - ON / Not connected to network access point or Internet |
|
Wi-Fi - ON / Network access point password protected |
|
|
Wi-Fi - ON / Connected to network, not connected to Internet |
|
Wi-Fi - ON / Actively connecting to network access point |
|
|
Wi-Fi - OFF |
|
Wi-Fi - ON / Actively disconnecting from network access point |
|
|
Wi-Fi Signal Strength (general): Three bars - Full Strength Signal Zero bars - Weak Signal |
|
||
The following troubleshooting information is not inclusive and is meant as a guide only. Other issues and solutions may arise that are not stated here. The following description of terms are provided for reference as used in the following troubleshooting chart:
| ● | Router - The data transmission device directly connected to your ISP. |
| ● | Remote Wireless Access Point - A wireless connection device between the router and your diagnostic thermal imager. |
| ● | Wi-Fi Radio - The internal diagnostic thermal imager radio transmitting and receiving Wi-Fi signals. |
| ● | Network Connection - Also called Wi-Fi connection. The configured Wi-Fi router connection the diagnostic thermal imager connects to. This connection can be secured (password protected) or unsecured (open). |
Checking Wi-Fi Connection Status
To access the Wi-Fi Status screen:
| 1. | Press the Menu  button. button. |
| 2. | Select the Settings icon from the toolbar. |
| 3. | Select Advanced from the settings menu. |
| 4. | Select Wi-Fi Status. |
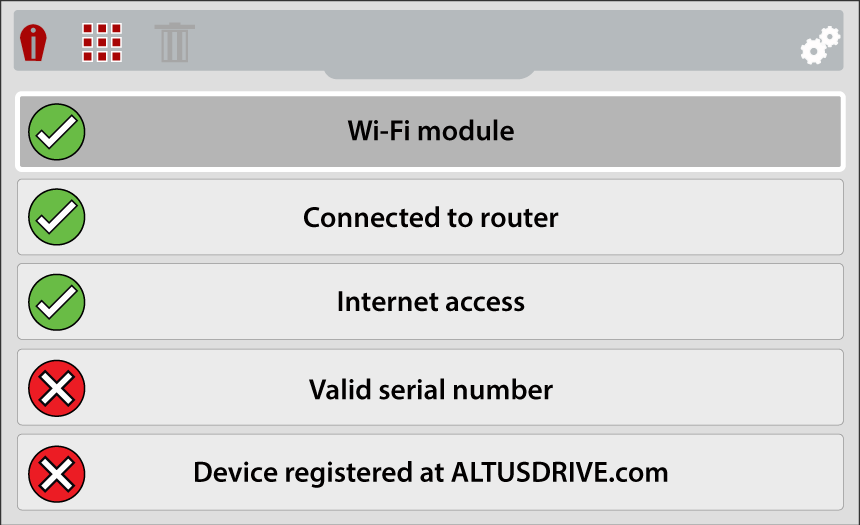
The Wi-Fi Status screen provides connection status indicators that can be used to troubleshoot Wi-Fi connection issues. Symbols are used to indicate status Yes/Connected (check mark), and No/Not Connected (“X” mark).
| ● | Wi-Fi module - Device Wi-Fi radio (on / off) |
| ● | Connected to router (network access point) - Device is connected to the network access point or router (yes / no) |
| ● | Internet access - Device is connected to the Internet (yes /no) |
| ● | Valid serial number - Device serial number is valid (yes /no) |
| ● | Device registered at ALTUSDRIVE.com - Device is registered to a Technician Profile (yes /no) |
Router Information
Router compatibility and setup are important factors to check when trying to determine connectivity problems. Although we have tested this device at the factory to verify connectivity, we cannot guaranty its connectivity with your specific equipment. There may be some situations that require your time for router connection troubleshooting and/or additional consultation and equipment. Snap-on Incorporated is not responsible for any costs incurred for any additional equipment, labor or consultation charges or any other costs that may result from correcting non-connectivity issues with this device.
Verify the following router settings BEFORE you begin troubleshooting a non-connectivity or “No Connection” problem. After each check, make any corrections as necessary then retest for connectivity. Contact your IT administrator or ISP for assistance.
| 1. | Check your router connection and if applicable, the remote wireless access point connection. |
| 2. | Clear saved Wi-Fi networks, see Clearing Wi-Fi Networks (below). |
| 3. | Verify: |
| – | Router is configured for one of these security standards WPA/WPA2-Personal, or WPA/WPA2 Enterprise for Client |
| – | Router is configured to use Dynamic Host Configuration Protocol (DHCP), not a static IP address. |
| – | Router and/or settings for this device are configured to 2.4GHz. 5GHz is not supported. |
| – | Router is configured to B/G and/or N standard wireless networks to 2.4GHz. 5GHz is not supported. See your router "User Guide" for setup, connection and troubleshooting procedures. |
| 4. | Check for router firmware and update to current version, if applicable. |
| 5. | Restart or reset the router. See your router "User Guide" for procedures. |
| 6. | Connect to a different router. |
Clearing Wi-Fi Networks
| 1. | From the Wi-Fi Connection menu, turn Wi-Fi off. |
| 2. | Turn the thermal imager off and then back on. |
| 3. | Return to the Wi-Fi Connection menu and turn Wi-Fi on. |
General Wi-Fi Troubleshooting
|
Problem |
Possible Cause |
Corrective Action |
|---|---|---|
|
No Connection with the Snap-on Cloud (images are not uploading) |
Technician Profile not setup correctly |
1. Check your Technician Profile and confirm the device is associated with your profile. 2. Contact Customer Support. |
|
Access may be temporarily unavailable |
Try to access the function at a later time as updates may be in process. |
|
|
Wi-Fi radio is turned Off |
1. From the toolbar select the Settings icon. 2. Select Wi-Fi Connection from the menu. 3. Press the UP button to select the Wi-Fi Power icon, then press the Y button to turn Wi-Fi on. 4. Connect to a known good network. |
|
|
Not connecting to a network |
1. Clear saved Wi-Fi networks, see Clearing Wi-Fi Networks . 2. Connect to a known good network. |
|
|
Wi-Fi connection drops off or disconnects intermittently |
Wi-Fi Signal strength insufficient |
Check Wi-Fi signal strength - out of range or interference. Move closer (within 50 Ft. (15 M) or into a direct open sight-line of the router or if applicable, remote wireless access point. Eliminate interference from overhead lights, windows, walls, other wireless devices, metal objects and devices that emit electrostatic discharge. |
|
Router overloaded |
Disconnect/disable other Wi-Fi devices connected to the router. |
